So firstly a little apology. I’m away this week at Photography Farm so there’s no Thursday Treats. “Waaaah” I hear you cry, but fret not, I have something even better! Who fancies making rainbow pom poms?! OH GOD YES!
You might remember Jen & Ben’s epic rainbow wedding… oh yes, it’s one of my all time faves too. So it’s taken a while but I’ve finally bartered Jen enough and she’s created a DIY tutorial of just how she made those fabulous rainbow pom poms… and if that’s not enough for you, she’s even done a step by step video!(scroll down to the end of this post).
Over to you Jen…

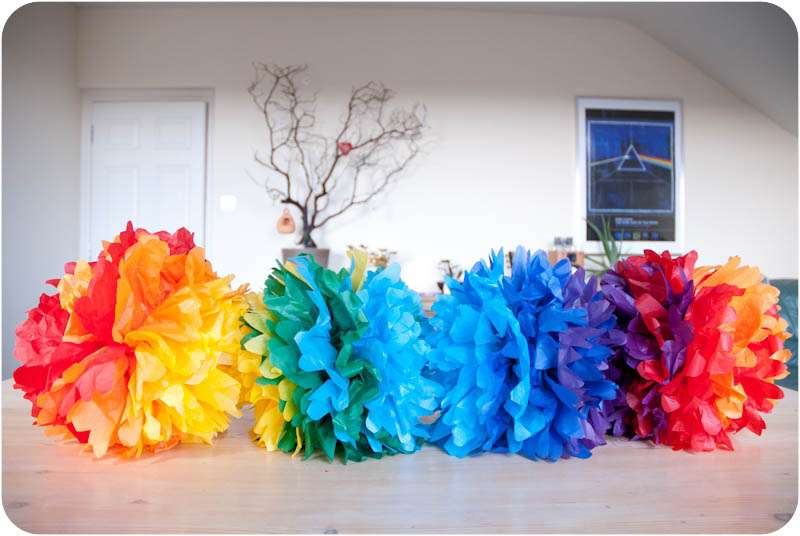
This tutorial shows you how to create your own seven colour rainbow spectrum pom-poms. If you prefer softer shades, I show you how to use the same technique for ombre pom-poms in my tutorial video. The method is the same, so you can use your own colours and get creative.
For rainbow spectrum poms, which look lovely as a garland, you will need 7 colours of tissue paper, and at least 4 sheets of each – I used red (fading into) orange (fading into) yellow(fading into) green (fading into) turquoise (fading into) blue (fading into) and purple.
When I was looking for tutorials for paper pom-poms for my own wedding, the number of sheets of tissue paper varied from tutorial to tutorial. I tried out lots and found that 12 sheets per pom-pom made the best, fluffiest poms. You can make the poms in lots of sizes. Large ones, by using the full sheet (approx. 50cm x 75cm), working to smaller ones by cutting the sheets in half, and smaller in half again and so on.
In this tutorial I am using 50cm x 75cm sheets cut in half, for a medium sized pompom.
Supplies Needed

♥ Tissue paper in rainbow colours (or your colours)
♥ Scissors
♥ Bendy craft wire
♥ Fishing line, thread or invisible thread for hanging
Method
Step One: Starting at one end of the spectrum (in my case, red), take four sheets of tissue paper from each of your first three colours. Four red (top) four orange (middle) & four yellow (bottom)

Step Two: Once you have your twelve sheets in a pile, you need to rearrange the colours slightly to get the graduated colour effect once the pom-pom is finished (this is the only part of the tutorial that may be a little difficult to understand, but once you get it, you will be flying).
The order is as follows for your top, middle and bottom colours: Top, top, top, middle, top, middle, middle, bottom, middle, bottom, bottom, bottom (are you confused yet?)
So that means for this pompom, the order will be; Red, red, red, orange, red, orange, orange, yellow, orange, yellow, yellow, yellow.

Step Three: Now you have your sheets in a pile, you need to get the sheets as square as possible in the stack.

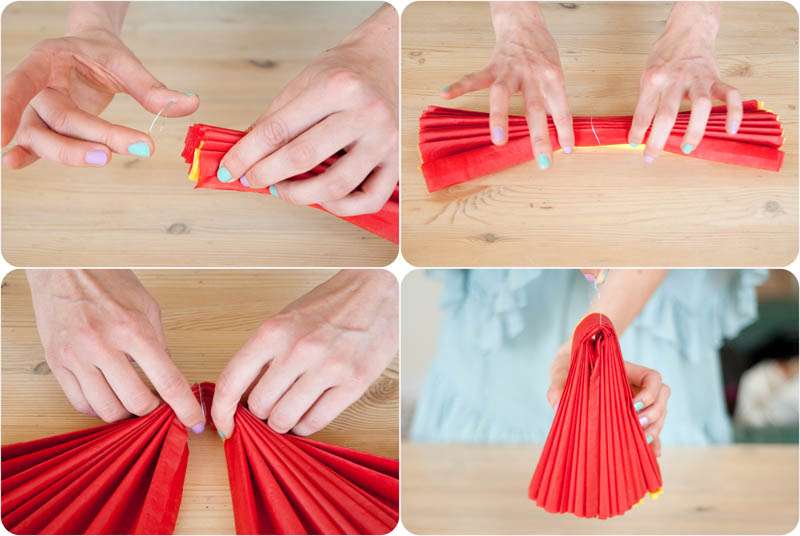
Step Four: Fold all your sheets back and forth (about an inch wide folds) as if you were making a paper concertina fan. Keep going until you reach the end.
Step Five: Grab your concertina fan and fold it in half.


Step Six: Set your paper fan aside and cut a piece of your craft wire approximately 15 cm long. Twist the ends of the wire to form a loop.

Step Seven: Post your paper concertina fan through your wire loop until it reaches the fold in the middle.

Step Eight: Squeeze the middle of the wire loop so that it forms a loop on either side of your concertina fan. Twist these wires to form little loops either side.
The wire has two functions; it will hold your pom-pom together, and the little loops will be what you use to hang the pom-pom. There are two loops so that you can string them together on top of each other, or to create a garland.


Step Nine: Cut the ends of your concertina fan into curves with your scissors. Both sides, and both ends.

Step Ten: Now you need to ‘froof’ your pom-poms.
Carefully separate your layers of tissue paper, pulling them away from the concertina fan one at a time. Be sure to pull them out from the folds as far as you can. On occasion, a little bit of tissue will rip, but don’t worry – the rips can be hidden in the volume.
Rustle, and fluff, and pull, and froof until your pom is a nice round shape.

Step Eleven: Part the pom-pom to find your wire loop, and tie some of your invisible thread or fishing line to it. Do the same on the other loop, and your pom is ready to hang.

Step Twelve: Make the other pom-poms in the spectrum and string them together!
There are 7 pompom’s in total which make up the spectrum garland, they are as follows
1. Red x3 – orange – red – orange x2 – yellow – orange – yellow x3
2. Yellow x3 – green – yellow – green x2 – turquoise – green – turquoise x3
3. Turquoise x3 – blue – turquoise – blue x2 – purple – blue – purple x3
4. Purple x3 – red – purple – red x2 – orange – red – orange x3
5. Orange x3 – yellow – orange – yellow x2 – green – yellow – green x3
6. Green x3 – turquoise – green – turquoise x2 – blue – turquoise – blue x3
7. Blue x3 – purple – blue – purple x2 – red – purple – red x3

 You can make them all the same size, or have larger and smaller pom-poms to mix it up.
Tissue paper pom-poms are so fun to make, and really stunning at a wedding or to decorate a party. I even have a few in my house – just because I love them so much!
I love colour, and especially graduated colours such as rainbow spectrums fading into one another and ombre.

Still confused!? Watch the video… it should help! Thank you Jen for sharing this awesome idea with us today! Be sure to check out her fantastic headpiece & fascinator company Head Full of Feathers.
If you’d like to submit a DIY tutorial of something you’ve made for your wedding then don’t be shy! Drop me an email with a photo of the finished item and a short description of what it is and we’ll take it from there!
All Photography Credit: Laura Power
