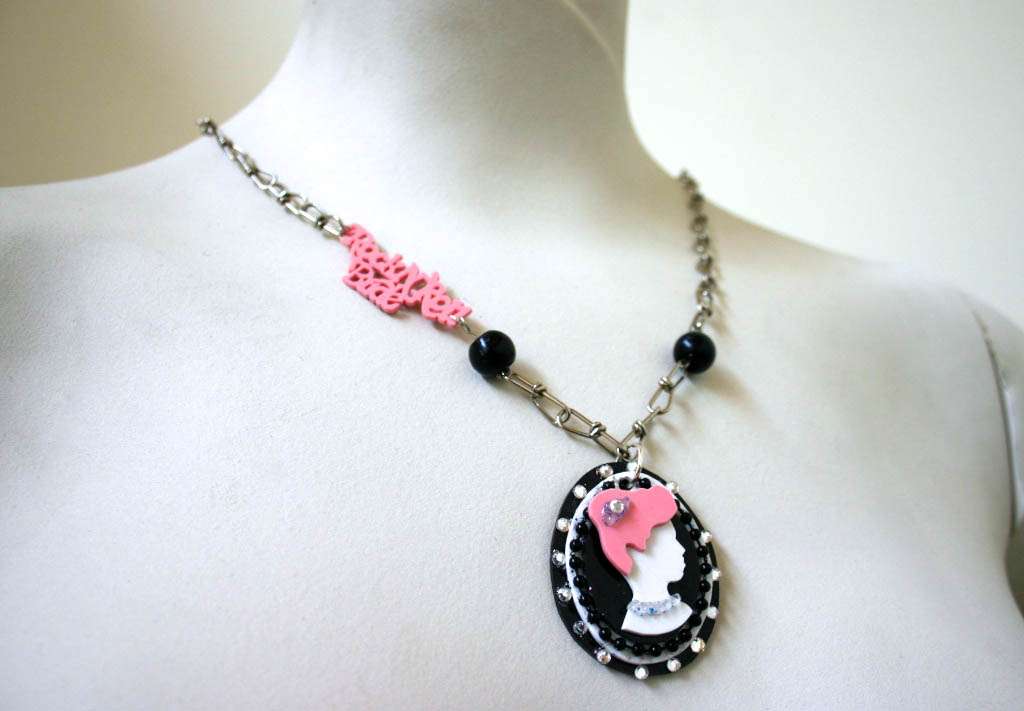
I may be biased but this cameo necklace DIY Tutorial from Cat Morley of crafty community Cut Out + Keep may be my favourite ever! If you’re of a crafty persuasion and fancy making some personalised wedding jewellery or gifts (how cute would these be for bridemaids?) then you’re going to get very excited indeed about this one…
Of course you don’t have to make your necklace of me (!) or with my logo but I’m sure this tutorial will inspire you to come up with your own designs. You could maybe put each bridesmaid’s name in place of the Rock n Roll Bride logo?
This tutorial looks like it might be complicated when you see how polished the final result is, but honestly I was shocked at how simple (and genius!) it is. All you need is a little shrink plastic (remember that!?)
Supplies Needed:
♥ Shrink plastic in a variety of colours
♥ Glitter glue
♥ Jewellery chain (can be bought from craft stores like hobbycraft or fabric shops)
♥ A clasp (again should be easy to find in craft or fabric stores)
♥ 1 large and 2 small jump rings
♥ 2 eye pins
♥ 2 small black beads
♥ Beaded Trim
♥ Small crystals
♥ Strong adhesive
♥ Wire cutters
♥ Jewellery pliers
♥ Tweezers
♥ Scissors
♥ Xacto knife
♥ Paper (for template)
Method:
Step One: Start with a portrait photo and trace around the silhouette on to paper. Make separate templates for the head, hair and the jewellery. Remember you’re template should be 7x bigger than you want your finished template to be.
Step Two: Cut out your templates and layer on top of each other. Create an oval template for your silhouette to sit on and then make a second slightly larger and third even larger oval template. Line up the two largest ovals and punch a hole through the top of both.
Step Three: Draw around the templates on to various colours of shrink plastic. When working with clear shrink plastic, use blue-tack to stick the template to the plastic and cut around it.
Step Four: To make a little charm for the chain, trace around the Rock n Roll Bride logo on to paper, trace on to shrink plastic and carefully cut out.
Step Five: Shrink down all the pieces of plastic in an oven, following the directions on the packet, until they lay flat and leave to cool.
Step Six: Use a strong adhesive to carefully attach the head to the smallest oval and leave to dry before glueing the hair in to position.
Step Seven: To give the jewellery a bit of sparkle, paint one side with glitter glue and position on the cameo.
Step Eight: Layer and glue the ovals on top of each other, making sure the holes are aligned on the larger two. Glue some beaded trim around the middle oval.
Step Nine: Glue small crystals around the edges of the largest oval.
Step Ten: Slip a jump ring through the hole on the cameo and attach to the desired length of jewellery chain. Snip the chain a short way up on either side with wire cutters.
Step Eleven: Attach eye pins to the chain and slip on beads at either side. Attach the Rock n Roll Bride charm to one side and use a jump ring to attach it to the chain.
Step Twelve: Attach a clasp at the back of your necklace and you’re all done!


